Okay, I seriously thought I already have this post uploaded in this blog, but it turned out I was wrong. I have kept this for a long time, and it helped me a numbers of times already so I reckon it will help others as well.
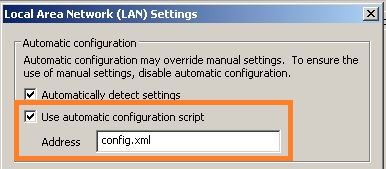
IE Connections. There are a few settings we can configured in IE Connections Settings such as :
- Automatically detect settings
- Use automatic configuration script
- Use a proxy server
- Bypass proxy server for local addresses
- Use different proxy servers for different protocols
- Proxy server exception.
For this post, I will list registry keys positions for each setting.
Objective : Grey-Out / Not-Grey-Out Automatic Configuration
Location :
- Hive : HKCU
- Key : Software\Policies\Microsoft\Internet Explorer\Control Panel\
- Value Name : AutoConfig
- Value Type : DWORD
Value Data : 0
Result : Not-Greyed-Out, settings for Automatically detect settings & Use automatic configuration script can be changed.
Value Data : 1
Result : Not-Greyed-Out, settings for Automatically detect settings & Use automatic configuration script can be changed.
Value Data : 1
Result : Greyed-Out, settings for Automatically detect settings & Use automatic configuration script cannot be changed
Objective : Checked / Unchecked Automatically detect settings
Location :
Value Data : 0
Result : unchecked
Value Data : 1
Result : checked
Objective : Enable / Disable Use automatic configuration script
Location :
Value Data : <Config URL>
Result : Config URL configured
Objective : Grey-out / un-grey-out Option to use proxy server
Location :
Value Data : 0
Result : option to use a proxy server for your LAN is un-checked, box to put proxy server and port disabled, Advanced box disabled, option to bypass prosxy server disabled
Value Data : 1
Result : option to use a proxy server for your LAN is checked, box to put proxy server and port enabled, Advanced box enabled, option to bypass prosxy server enabled
Objective : Set Proxy Server
Location :
Value Data : ProxyName:port
Result :
1) proxy and port configured
2) Use the same proxy server for all protocols will be checked automatically, and all protocols will be using the same proxy and port number
Objective : Check / un-check Bypass Proxy Server for Local Addresses
Objective : Checked / Unchecked Automatically detect settings
Location :
- Hive : HKCU
- Key : Software\Microsoft\Windows\CurrentVersion\Internet Settings\
- Value Name : AutoDetect
- Value Type : DWORD
Result : unchecked
Value Data : 1
Result : checked
Objective : Enable / Disable Use automatic configuration script
Location :
- Hive : HKCU
- Key : Software\Microsoft\Windows\CurrentVersion\Internet Settings
- Value Name : AutoConfigURL
- Value Type : REG_SZ
Result : Config URL configured
Objective : Grey-out / un-grey-out Option to use proxy server
Location :
- Hive : HKCU
- Key : Software\Microsoft\Windows\CurrentVersion\Internet Settings
- Value Name : ProxyEnable
- Value Type : REG_DWORD
Result : option to use a proxy server for your LAN is un-checked, box to put proxy server and port disabled, Advanced box disabled, option to bypass prosxy server disabled
Value Data : 1
Result : option to use a proxy server for your LAN is checked, box to put proxy server and port enabled, Advanced box enabled, option to bypass prosxy server enabled
Objective : Set Proxy Server
Location :
- Hive : HKCU
- Key : Software\Microsoft\Windows\CurrentVersion\Internet Settings
- Value Name : ProxyServer
- Value Type : REG_SZ
1) proxy and port configured
2) Use the same proxy server for all protocols will be checked automatically, and all protocols will be using the same proxy and port number
Objective : Check / un-check Bypass Proxy Server for Local Addresses
Location :
Value Data : <local>
Result : Bypass Proxy Server for Local Addresses checked
Value Data :
Result : Bypass Proxy Server for Local Addresses unchecked
Objective : Set different proxies / ports to targeted protocols
Location :
Value Data : http=httpproxy.co:10;https=httpsproxy.co:20;ftp=FtpProxy.co:30;socks=SocksProxy.co:40
Result : different proxies / ports set to targeted protocols. Use the same proxy server for all protocols option unchecked.
Objective : Set URLs for proxy exception
Location :
Value Data : URL01;URL02;*.url03;URL04.*;*URL05.*
Result : URLs will be set at proxy exception
- Hive : HKCU
- Key : Software\Microsoft\Windows\CurrentVersion\Internet Settings
- Value Name : ProxyOverride
- Value Type : REG_SZ
Result : Bypass Proxy Server for Local Addresses checked
Value Data :
Result : Bypass Proxy Server for Local Addresses unchecked
Objective : Set different proxies / ports to targeted protocols
Location :
- Hive : HKCU
- Key : Software\Microsoft\Windows\CurrentVersion\Internet Settings
- Value Name : ProxyServer
- Value Type : REG_SZ
Result : different proxies / ports set to targeted protocols. Use the same proxy server for all protocols option unchecked.
Objective : Set URLs for proxy exception
Location :
- Hive : HKCU
- Key : Software\Microsoft\Windows\CurrentVersion\Internet Settings
- Value Name : ProxyOverride
- Value Type : REG_SZ


Comments
Post a Comment